Thursday, October 31, 2013

Pinterest Inspired: Pillows

I love Pinterest!

I love the unending possibilities that assail me and I could spend hours going through pictures and boards and DIY's and goofy stuff etc. etc. I actually have a couple of folders filled with pictures (from Pinterest) of things I want to recreate. I'll probably still be working on recreating the items in that folder when I am 80 :) (assuming there are no more additions to my crafty list that is).

Anyways, I came across this DIY pillow complete with instructions the other day, and I knew it was just what the Doctor ordered for my sitting room.

Here's the picture (I cant seem to find the Pinterest picture which was a collage type tutorial with the steps in pictures).
Source: Pinterest
Upon searching the internet, I was able to locate the tutorial complete with a free template (I sure wish I had seen this before making mine) on Design Sponge.

Here's My version.


I wanted Bright colors so I skipped the Color wheel idea and used a colorful print with a matching plain fabric. I also added large matching buttons on both sides.

I asked DH to help with the stuffing and he got a little trigger happy. lol. And the result is a pillow that looks about to explode...
I wasn't in the mood for  repeating the task so we decided to leave it as is and reduce the stuffing when doing its first wash.

I originally planned to make two poufs, but after sewing and ironing the 24 rectangles I had a change of heart and decided on a much simpler pillow in the same fabric to complete the look.

(Pardon the shadows, these pics were taken at night)

This I'll call the "Ruffled Heart" Pillow. DH called it the Girly Pillow :D

Matching Button

Both pillows took less than an hour to make. And pillows are officially my new "think-free" go-to gift idea for friends' birthdays and anniversaries.

Did I mention I love my new pillows? I do :D


Love,

Preye

Wednesday, October 30, 2013

A Not-So-Little "Underthing"

Hello People,

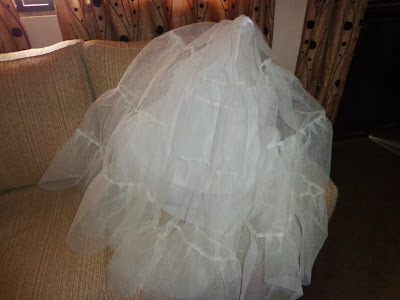
So today I spent quite a bit of time working on the wedding gown...rather a petticoat to be worn underneath to give it structure and shape.

I spent some time doing some research on a suitable shape for the dress style and fabric weight and after about an hour of research, I settled on a two hoop petticoat with a crinoline (or net) overlay.

A couple of weeks ago I finally located a reasonably priced stiff net in Ivory and purchased about 5yards (I also bought some in white which I plan to dye and use for some bird nest veils for the BM's and MOH...but the dyeing process hasn't been as successful as I anticipated, but that's gist for another day).

I started off by cutting 10" wide strips of net for the gathers...four steps in all, and then cut a quarter  flare skirt out of a matching fabric to line the petticoat.

I attached two rows of polyester boning to the flared skirt. I like this particular boning because I can sew on it and eliminate the extra stress time I would have used to create casings. It is not as stiff as the plastic? type though.


Next was the net. I started with gathers on the first step, but it was so time consuming I had to resort to doing pleats at intervals. The net is stiff enough to hold its own even without the extra "puff" from gathers...plus, the boning gives the petticoat some added structure.


I attached the net to the lining at the waist, matched up the boning ends and sewed the center back with about 10" left on top...which I bound with a matching bias tape.


I finished (well, technically its not finished as I may add one more ring of boning to the bottom and then attach some gathered fabric, but this is dependent on the bride's preference) it off by cutting a long strip of fabric on the bias and binding the waist with about 12 inches extra on each end. This will be tied and tucked in to secure the waist.


I don't have a dress form (yet), so these are the best pictures I could get. They don't really show the shape given by the boning but they at least give a general idea.


Here the hoops are visible :)
I am so excited and eager to see how it would look under the dress...and of course that's some motivation to speed up the process...I just might finish the wedding dress in one week :D. I have measured and cut out the pieces and even positioned/pinned the pleats, so hopefully I'll have some progress pictures within the week.

Until Later, Much Love and God Bless you


Preye


Tuesday, October 29, 2013

Leather Insert Purse

A couple of months ago I ordered some leather hides from overseas and they had (or have depending on the perspective :D) been sitting there giving me the side eye. Considering I spent quite a bit on them not to mention the shipping cost, I was a little (ok, a lot) hesitant about using them and not liking the results afterwards.

And then one day I had an itch for a quick project and chose to make a purse. I happened to drop my chosen print fabric close to my red leather and voila! I got the inspiration for this purse.

The red leather plays off the green and black twirls on the print fabric if I say so myself :)

I lined the purse with black shantung and added inner pockets. The picture is not so clear but I trimmed the pockets with the leather as well for some little pizzazz


I decided to use some Velcro for the purse closure cause I am all about ease and functionality.

And to finish it off, I stacked some buttons on the right side of the purse in the colors of the print fabric and hot glued some matching sticky jewels.

All in all, it was a successful project and more importantly, I didn't have to commit to using more than a little scrap of my precious leather.

One more purse to add to my collection :)

Until later, God bless.

Preye

Monday, October 28, 2013

Wedding Dress and other Adventures

I am working on my biggest project yet! a wedding gown...I have never sewn anything of this magnitude or importance but the bride has so much faith in my abilities (more than I did initially to be honest...lols) and I definitely have to deliver on it.

Its a knock-off of the Pronovias Dalia Dress. 


Thankfully its a pretty straightforward design and we're doing it in fabrics that are easy to handle (I don't think I can handle a chiffon wedding dress just yet)
Did I mention I am also doing her veil...Here is a picture of what she wants replicated. 


I've got everything on hand except the sequin and beads in the right shade of ivory. Hopefully I'll be able to source for that within the week.

Alongside the wedding dress, I am also working on the Maid of Honor dress and Six! bridesmaid dresses.

The MOH dress is a long flowey lace creation with embellishments at the waistline, while the BM dresses are identical Lace Peplum dresses.

I'll post pictures of the dresses as I go along.

The wedding is less than a month away and combined with my office job, I definitely have my work cut out for me.

Until next time...Blessings!